31 March 2011

Where the Ocean Meets the Sand Snow

By combining both the ocean and terrain objects I had previously made, a good looking coastline is made.


The daylight system creates a quite realistic view. Adding motion blur to the bullet which passes the camera also helps.


And here is the rendering

Ocean / Bullet Scene

Immediately after the scene from the previous post, the camera will follow the bullet across that ocean briefly seen at the end of the window shattering. I used the ocean scene I made earlier. Just to recap, the ocean material was made with 'arch and design', selecting the water template and adding an 'ocean (lume)' map. It is lit with a daylight system found under create > systems. The camera target and bullet are linked so it follows automatically.

Glass Scene

After the success of shattering glass, I needed to put that into a scene. Using my already-built ocean scene and intro title scene, I combined them to form this.

The camera starts face-on at the title scene. This scene is enclosed in a box away from the daylight system in place for the ocean. The light has given it a bit of a blue tint, but after all the hassle I went through to get it to look that normal, it will do. Normal and mental ray lights don't work well or at all with a daylight system.


By deleting the side wall that has the window in it, I accidentally stumbled across this pretty interesting effect. The glass refraction makes the scene look like its in some sort of bubble. I decided not to keep this effect because it made the glass shattering look very weird.


Adding motion blur to the bullet gives this (admittedly abstract) scene a little realism.


Here's a low quality test render of the glass shattering.


And here is the full scene with good render settings.

30 March 2011

Tutorial 10 - 30/03/2011

Today is about making bipeds. Firstly, a basic man be built, but this character was downloaded as part of the tutorial. Next, a biped is placed by going to create > systems > biped. The biped should be made as close to the height of the character as possible. With the biped selected, go to the motion panel and activate figure mode. Now the biped can be positioned inside the mesh. Use wireframe view for this.

After all of the bones are positioned and sized appropriately, make sure to deactivate figure mode. Apply the physique modifier to the character and select 'attach to node'. Click the diamond near the biped's pelvis (com) and a dialogue box should appear. Click initialize and yellow stars should appear at the end of each limb and head.

When a bone is moved, there is likely to be stretching where a bit of the model is left behind. This is fixed by going to 'envelope' under the physique modifier and increasing the envelope of each bone by increasing the 'radial scale'. Once this is done, the character should move nicely with the bones.

Now just go back to the motion tab with the biped selected and activate footstep mode. Under footstep creation choose your walking mode then click 'create multiple footsteps...'. Choose the amount of steps and click OK. Then select 'create footsteps (append)'.

Finally, click 'Create keys for inactive footsteps' under footstep operations and thats it. For my video, I cloned the body to make three and gave them each a different movement style.


And now we've got three happy bipeds having a frolic in the field.


My earlier attempt using my own Bond model can be found in this very blog at:
http://alexchapman.blogspot.com/2011/03/rigged-woo.html

29 March 2011

Shattering Glass

As I need to send a bullet through a pane of glass in my animation and failing miserably using PArray, I looked to other methods. I found success with a box cut up using ProCutter and a rigid body collection for the impact.

Firstly, a box is created to the size and thickness wanted for the pane. In the front view using the line tool, draw out the shatter lines. This will be used to split the box into segments for shattering.
It looks something like this...


Those lines are then extruded (modifiers > extrude) and sized so they completely intersect the box. The extruded lines must come out either side of the box and extend past all sides of the box for it to work.


By selecting one of the extruded line segments and going to compound objects and selecting ProCutter, click the box. It should split the box into segments like the image below.


By selecting the extruded lines and right clicking > hide selection and then building a simple frame, the object below is made.


A bullet I previously made for my gun was then imported and autokeyed to animate through the 'glass'. Add the frame, glass pieces and bullet to a rigid body collection. Give the frame a mass of 0 and set to unyielding so it won't move at all. Give each glass fragment a mass of 5 and set to inactive so it only moves on impact. Give the bullet a mass of 20 and also set to unyielding and concave mesh. The gravity in Havok's parameters can be played around with too to make the glass pieces fall differently. 

By adding a 'fracture' found on Reactor's toolbar, the glass panel will split more realistically when hit. Increase the energy loss to about 0.6. This will hold the pieces together just for a fraction of a second on impact so they don't explode out quite so violently.


Here is the animation...


With materials added, the cracks can be seen before the bullet hits so an identically sized but unshattered box is used. The unshattered box will be visible before impact then become invisible as the bullet strikes. The shattered box needs to be invisible first then appear on impact. This is done by opening the dope sheet (right click object > dope sheet) and going to the frame you want the switch to occur. Click the unshattered box and go to track > visiblity > add. Go to controller > assign and select on/off. Now select 'add key' and place one at the correct frame. This should make the line disappear to the right. Then the same method was used for each shattered piece of glass so the dope sheet looks like the image below.


And here is the final effect.


Nice.

Mental Ray Daylighting

As my final animation requires a scene where a bullet is followed over an ocean, I decided to work with lighting effects on my previously made ocean scene. To test out reflections and to just create a bit more of a scene, I quickly put together a basic boat.

With the boat, water and camera already in place from before, I set up a daylight system by going to create > lights > daylighting. By going to the modifiy panel of the newly created light, sunlight should be set to mr (mental ray) sun and skylight set to mr sky. Set position to manual also. The light should be in the centre of the  water plane and shining down from above.

The colour and intensity of the sky can be adjusted with the Blue/Red tint and saturation options.


To create a duskier scene, the Red/Blue tint and saturation is increased. This makes the sun glow more orange.


The scene can be made foggy by increasing the mr Haze option to about 2.0 and setting the visibility distance to about 100 to make it distant over the ocean. In mr Sky, the suns intensity can be increased by turning up the multiplier.


After adjusting various parameters and camera angles, this is the final effect I will use in my animation.


I was going to look at using Reactor to create the water so the boat realistically bobbed up and down, but due to deadlines closing in I thought I should get on with what already needs to be done instead of extra effects. Here is a rendered video of the scene.

25 March 2011

Complete Scene 1

After an unexpectedly long rendering time, my first scene is ready to be edited in Premiere Pro. The scene is rendered to PAL 768 x 576. The quality of the render is not great / not terrible with the final gather set to low and the anti-aliasing set to medium 1/4 4.


Hopefully I don't spot anything I need to change because I don't want to have to render it again!

24 March 2011

Smoking Laser

To make the laser have a little bit more interest in the first scene, I have decided to use a superspray particle system to create some smoke as it hits the table.


As the laser moves, so does the smoke which drags in the wind like it would in reality. Just as with the car skidding, the effect is achieved by changing attributes in the system parameters. The material for the smoke was made by applying a radial gradient to the opacity map. Firstly, the diffuse colour was set to grey. Then, in the maps rollout, opacity was set to 5. By clicking 'none' next to the word opacity, I applied a gradient. The gradient was then set to radial by selecting the option.


Skidding Car

Here is one brief shot that will be used in my animation of the Aston Martin DB5 skidding around a corner in some snowy mountains.


The previously built car was imported into the terrain scene and animated using autokey to move forward and rotate at the corner. A 'superspray' particle system was used to achieve the snow spray from the back wheel by increasing the size, amount, colour and lifespan of the particles in the system's parameters. The scene was made foggy by going to rendering > environment and applying a 'volume fog' effect. Motion blur was also added to the car by right clicking it, going to object properties and choosing to enable motion blur.

I used a skylight in this scene which was important for the look. The first image on the shows with the light, and the one below shows without.


Without the light, nothing reflected from the snowy surface making it look dirty. The black speckles in the sky are from a 'snow' particle system. This system won't be used as I didn't like the effect it gave the scene.

Final Storyboard

Here is my final version storyboard for the animation.


The first scene has now been rendered as well as one angle of the camera following the car which will be posted soon. As for the rest of it, almost all of the models are complete and ready to be animated.

23 March 2011

Tutorial 9 - 23/03/2011

Today is about using reactor. First off I will use it to make some spheres roll down into a box.


This was done by making a box with an inset, extruded face and some planes. A rigid body collection was inserted and all of the objects in the scene were added to it. All objects except the balls were set as 'unyielding' because they do not need to move. Everything was set to concave mesh also. Each sphere was given a mass ranging from 3 to 5. When preview animation is clicked, a window appears showing the animation. If this is correct, click create animation and render. The video above is cut short because my timeline wasn't long enough to accomodate the animation, but you get the idea.

Next was to make a curtain. A plane, cylinder and three torus shapes made the scene.


Using reactor, the curtain hooks were set to unyielding. Everything except the curtain was added to a rigid body. The reactorCloth modifier was added to the curtain and the curtain was then added to a cloth collection. Vertices of the curtain were assigned to each hook by going to modify in the reactorCloth parameters. By linking the curtain to the hooks it can be animated as above. Reactor wind was also added which just needs to be pointed at the curtain.

17 March 2011

Scene 1 Test Render

Using only animating techniques mentioned earlier in this blog, I have rendered a draft version of my first scene. I may change the speed of the camera and most probably increase the render quality (even though this took long enough!)


Overall, good result.

My next blog update will be addressing any issues received from the week 6 feedback hand-in.

16 March 2011

Tutorial 7 - 16/03/2011

Today the tutorial is about animation methods. First off is the path constraint. By creating an object that you want to move (a sphere in this example) and the 2-dimensional path for it to follow (a circle), the object can be made to follow that path. Have the object selected then go to animation > constraints > path constraint and  drag from the sphere to the circle. Click play and the object should move around the path.

Objects can be made to act differently, such as banking, on the path in the parameters. By adding a camera following a circular path and an omni light in the middle, the following effect was made.


Next is the manipulation of materials over time. By activating autokey and changing a material at points in the timeline, the effect below was achieved.


Finally was the propeller which was rotated many times while autokey is active. The rendering has motion blur which can make a well modelled propeller look realistic. This was made by right-clicking the object and going to object properties. In the motion blur section at the bottom of the dialogue box, select image and increase the multiplier. Mine was increased to 7. Keep in mind...more multiplier = more rendering time.

OK... now I'm done.

Here's the render of the laser room. Very low quality, but it is only intended as a quick draft.


It is difficult to notice, but the TVs are also working. This is rendered with a static camera that is far away so the whole set can be seen in one shot. The final piece will have a closer, moving camera where smaller details will hopefully be clearer.

15 March 2011

Time for a break.

After the problems outlined in the post before, I have finished the new Goldfinger rig. I did it much faster the second time round so I think I have got to grips with the very basics of biped rigging now.


There was also much less need for envelope adjusting too which hopefully means I set it up better than last time too. He also doesn't have the upper arm issue he did either. Overall, perhaps the importing issue helped me to improve?


Now Goldfinger is set in motion, all I need to do now is animate the laser and make the two characters have a bit of eye contact.

Also, as a note I forgot to mention before, the television screens on the bench will have working video in the rendered animation. This is done by assigning a .avi file to the diffuse of a material and applying it to the plane that is the TV screen.

The video I used can be found here:
[Internet] [Accessed 15/03/2011]

As I only wanted a very brief portion of it I used Adobe Premiere Pro to cut the part I wanted to use.

More problems....

After yesterdays success of having a walking Goldfinger, today I tried to import the character into the required scene. Typically, it all went wrong. After importing the character as I always have by going to import > merge, Goldfinger turned into some tangled mess. Why wouldn't it work? Because it would be too easy for it to just work!


Either way, this is more or less the finished version of the first scene's look. It is quite a low lit scene anyway, but this image seems to make it look quite a bit darker than it is.

However, during writing this blog update, it turns out my unrigged Goldfinger works perfectly well, so I think I will just re-rig him in the scene. The work continues.

14 March 2011

He's alive. He's ALIVE!

After a (pretty quick) render, here's my animated Goldfinger!


I am very happy with the smooth animation that the biped allows and I think this technique will be a great addition to my final animation. I obviously need to redo this render with the character in the scene but this has served as a good test. Firstly, he as some upper arm issues and I am not sure why. Maybe the bone envelopes have distorted the shoulder area? And also I should hide the actual biped skeleton because very briefly in the rendering a bright green bone came out of his arm.

All in all, very happy with this one.

Character Rigging

Today I have finally gathered together the energy and patience needed for my first go at character rigging. 

This was all done with a lot of trial and error, and a bit of help from:
[Internet] [Accessed 14/03/2011]

Using the Goldfinger model I had previously created, I will use the 'biped' system to animate him. Firstly, I set my character model to see-through so I can see the bones to edit them. Next, the biped is made by clicking create > systems > biped. Click and drag to make the biped the same height as the character. Scale and position each bone so it is in the centre of each body part it relates to.


The image below shows both arms raised. The character's left arm has had all of the envelopes adjusted properly, while the right arm is how it did look without any adjustment.


Envelopes (the red rings seen in the image below) are the markers for which part of the body is affected by the bone. All vertices inside a bone's envelope will be moved with that bone. The image above shows that the envelope on the right arm didn't cover enough of the vertices so it needs to be larger.


With half of the body complete, the envelopes can be copied to the other side by clicking 'copy' in the envelope parameters, clicking the opposite bone, and clicking paste. This will increase your productivity 50%!

Both images below show how the character looks after moving an arm and a leg.


The upper arm envelope is not set correctly as a crease has appeared. However, this will not be visible while the character is walking, so it is not necessary to fix. I will come back and alter it if I have time before the end of the module.

Once the biped's bones are fully in place and all of the envelopes have been adjusted properly, the biped can be made to animate very easily. Below is an image of the character ready to walk by following 'footsteps'.

Footsteps are achieved by clicking on the biped and going to motion > biped > footstep mode. Under footstep creation, have 'walk' clicked then choose 'create multiple footsteps'. Change how many steps you want in the dialogue box then click ok. Click 'create footsteps (append)' then under footstep operations click 'create keys for inactive footsteps'. The path is then set, just press play. Each footstep can also be selected and rotated to create different movement paths.


My next post will hopefully be a short rendered video of the character walking. Fingers crossed...

7 March 2011

Title Screen

Today I began to create the title screen for my Bond film trailer. This scene will be the second in my 30 second trailer. Firstly, I create a plane to serve as the background. This was coloured black for now.

By going to create > shapes > text under the 'splines' tab, the text was made. By changing various parameters such as size, font and typing in the required text, the outline of the word 'Goldfinger' was done. To make the text solid rather than just lines, the 'bevel' modifier was added and some parameters changed. This process was repeated for the '007' text.

The material was created by setting a gradient to the diffuse for both the gold and silver texts. By altering the colours, a lighter stripe was placed across the middle of each word.

My previously built gun model was then added by going to import > merge. The gun model was added rather than a more suitable graphic because I need it to animate to be the bridge between this and the next scene.


My previously built Bond character was then added to the scene in the same way as the gun. He was scaled and positioned as required. His arms were adjusted rather crudely just by using soft selection. I didn't feel it was a good use of time to move his arms properly when they are going to be off screen anyway. The gun was cloned and positioned in his hand. The head was then rotated towards the camera while his body was rotated away making him look over his shoulder in a more dynamic pose.


Finally, a target spotlight was added into the mix. By shining it from above and to the side, shadows are cast and creates a good effect.

I can't decide if I prefer the black or gold background version. The black background creates a moodier atmosphere and seems to give Bond a look as if he were raising one eyebrow. 


The gold background also works well, but isn't so moody. However, it does show the shadows cast by the light much better. For some reason he now looks like he is squinting...perhaps the light is too bright for him?


This image won't be on screen for too long, and the area of empty space has been left purposely as this is where the gun will animate.

3 March 2011

Some terrain effects.

My final animation will need some open space for the action to take place in, so with the help of online tutorials, I have created an ocean and a mountain scene. The results are definitely impressive without much difficulty. The tutorial for the ocean is:

http://www.3dtotal.com/team/Tutorials_3/3dsmax_water_surface/water_surface_01.php
[Internet] [Accessed 03/03/2011]

and the tutorial for the mountains is:

http://www.3dtotal.com/team/Tutorials_2/terrain/terrain_01.php
[Internet] [Accessed 03/03/2011]

To start making the ocean, a plane was created and the 'Arch & Design' material was applied to it. In the material's parameters, 'ocean' was assigned to the special purpose maps section. Following the tutorial, various colours and values are altered. A gradient is then set within the existing material and more colours are altered.


It is a quick and simple process that takes about 10 minutes or so depending on your knowledge of the program (as long as you have the tutorial in front of you like I did). It looks very realistic as far as I am concerned and will be a good asset for my animation. The best part is, it automatically animates!


The quality of the render is low, but you get the idea. As for rendering time, well, I cooked myself some dinner, ate it and watched a little bit of TV while it crunched that code. Nice end result though.

Next, the mountains. A little bit trickier than the ocean, but not by much, and also produces a fantastic end result. A 550 x 500 (3dsmax's generic units) plane was created with 50 length and width segments. A 'smoke' map was then set the to diffuse with some adjustments made to values. A 'displace' modifier was assigned to the plane and the previously made smoke map was then added into the modifier.


Depending on whether your computer is up to it, increase the length and width segments of the plane to get a more complex look. A turbosmooth modifier was also added. Next, the colour needs to be sorted. This is done with a 'mix' material. Lots of values are then changed within this 'mix' and it gets a little confusing. Just stick to the tutorial for now and you will be fine. If you've seen the film Inception, you'll know how confusing it can be when I say its a material in a material in a material...we need to go deeper.


With the turbosmooth turned on only when rendering (to save your computer's poor CPU imploding) the result looks like this for now.


It even looks good close up.


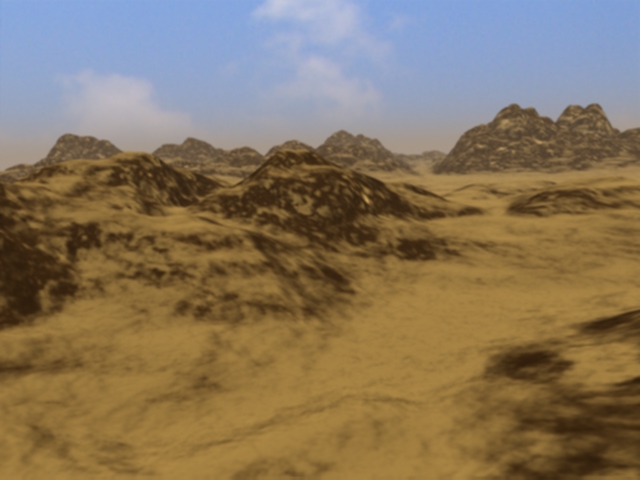
Adding a sky image and some fog makes it look even nicer. Go to rendering > environment and set a sky image to the background map. For the fog, click 'add' in the 'atmosphere' parameter in the same window. Choose fog and change the colour.


And it is finished. However, I am more interested in a snowy scene than a desert for my animation, so all it takes is some colour adjustment to the mountains and fog, and there it is.


Scene 1

Started work on the setting for my first scene in the trailer today. The aim is to have a scene that looks roughly like this:


First things first, so I created walls and a floor out of boxes. The left side wall has an indent to accommodate the scientist's side room later. The walls and floor were assigned the two bitmaps referenced below and the tiling was adjusted to get the desired effect. The specular and gloss properties were also altered to make it look more laminated.

http://powertextures.org.ua/textures_en.html
[Internet] [Accessed 03/03/2011]

http://www.flooringmania.co.uk/quick-step-flooring/classiclaminateflooringrange/enhancedoaknaturalvarnished_245.html
[Internet] [Accessed 03/03/2011]


The machinery lining the walls in this room were textured with the image found here: 
[Internet] [Accessed 03/03/2011]

The chairs and desks are simple shapes done with box modelling just to fill the room a bit. The red lighting was achieved by adding a spotlight and changing the hue in the parameters. A darkened glass effect was assigned to some thin boxes positioned around the room and the stairs are made from boxes with a metallic material.


A bench with screens was then added to the side wall by cloning a previous bench and just altering the shape a little. A tall lamp was then built which was made from a box and cylinders. The cable stretching to the wall was made with the lofting technique. This allowed a good curve to be made. Soft selection was used to pull the cable off the ground when it neared the wall.


The images on the bench to the left were made by assigning a bitmap as usual, and also checking the self-illumination box to make them look more like LCD screens. The two images are referenced below.

[Internet] [Accessed 03/03/2011]

[Internet] [Accessed 03/03/2011]


A small light was then added to the side bench. It is a target spotlight with the 'multiply' parameter toned down to give it a soft glow. The metal sheeting on the floor where the restraint table will go later has been positioned. The ceiling was made by assigning the preset 'tiles' to the bump section and increasing the tiling.

The image below shows the rendered scene after people had been added into the back room.


The people are just clones of the character I had previously built. The head was deleted and replaced with a skin coloured sphere. No use having all those vertices when you won't see them! The sitting characters don't even have legs...


A simple set of benches and some more cloned chairs were added the the other side of the room as more filler. The laser and table set I had previously built were merged to the scene then positioned and scaled appropriately.


By rotating Bond's head so he is looking towards the laser completes the scene for now. All that's left for this opening scene is to rig the Goldfinger character with a 'biped' so I can have him walking etc to put a bit of life into it. The rigging is proving a struggle, but hopefully in the next few weeks I will work it all out and have time to add it in before the end. Thankfully, the Bond character won't need rigging as the restraints on his arms and legs limit animating potential! Small movements can manually be done. More details such as clutter on desk surfaces can be added, but for now this will do and I am happy with how it looks.