26 February 2011

Not another 3D update...

After redoing my gun model because I felt I had gained a lot more skills after making it, I have given my car model another go too. Similar techniques were used. First thing was to apply the symmetry modifier down the middle of a box that was roughly the shape of the car on the reference plate. The pictures I used for this model can be found here;
http://static.ajb007.co.uk/assets/media/2005/11/astonmartindb5-front.jpg
[Internet] [Accessed 25/02/2011]

and here;
http://theprodigalguide.files.wordpress.com/2010/08/db5-side.jpg.
[Internet] [Accessed 25/02/2011]


Lots of extruding, welding, mesh smoothing and texturing later, here is the new DB5 model.


To show how I feel my skills have improved throughout this module, here is a comparison of the old and new.


Just as an added extra, I have not rebuilt, but modifed my laser to have better textures and detailing. The ceiling mount has been chamfered and the laser tip has been bevelled along with a few other alterations.


That's the update over, and with that I think I now have my 3 models ready for hand in and have hopefully demonstrated some good modelling techniques!

22 February 2011

Characters

Using the person model from before, I decided to make hair out of polygons rather than using the more realistic hair tool. I found the hair and fur modifier took too long to render and didn't look quite right. In the right hands, I can see this modifier being very good though. Assigning a wood material to the diffuse and changing the two colour presets to black and grey, a good hair effect was achieved.


By changing the hair colour and scaling the body so it is shorter and fatter, a new character could be made. To differentiate even more between Bond and Goldfinger, I changed the long tie to a bowtie which is worn in the film by the villain.


Unfortunately, Goldfinger turned out a little too short, so I merged the previously made Bond and scaled him to match better. Here's the two characters that I think are complete aside from the animation rigging which I will begin later.

Final Gun

After some more alterations to the gun from before, I think I am happy with this as the first of my 3 models needed for week 6 that is complete. The materials and model have been improved and I have redone the grip to include a magazine of bullets.


19 February 2011

Bang!

A quick animation of the new gun model...

18 February 2011

New Walther PPK

I looked at the PPK model I had made from before and decided that with my new knowledge of 3ds max I could make a much better one. The reference I used for the gun can be found at: http://en.wikipedia.org/wiki/File:Walther_PP.jpg 
[Internet] [Accessed 18/02/2011]


and the reference I used for the bullet is:
http://en.wikipedia.org/wiki/File:9mmLuger.jpg
[Internet] [Accessed 18/02/2011]

I used the box modelling method again to make the model. Starting with a box and extruding edges, I formed the five pieces I needed. Some parts were purposely built as separate parts so the gun could be animated later.


The metal texture was achieved using the anistropic shader. A high specular level and low gloss combined with a very low speckle map set to 'bump' made the look of the gun. A mutli object material was used on the part of the gun containing the grip. Those faces had their material number set to 2, while the rest was set to 1. A low specular black made this colour.

The top can be pulled back as a real gun would. This would happen as the gun fires to allow the used bullet case to leave the chamber.


The trigger is a separate part and has the appropriate pivot point so it can be pulled during animation. The used bullet case can then be ejected from the chamber as the bullet fires. The image below was made before the final detailing and textures had been added which are on the images above.


And finally, here is a quickly built setting for the new gun model.

17 February 2011

3D Face Continued

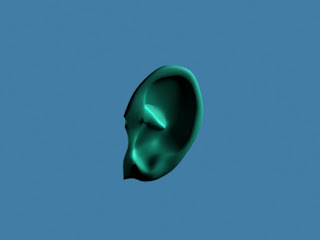
Continuing on from the 3D face I have been building, it is now complete. Below is an image of the head in its final shape before the ear is attached. The ear is modelled separately then attached later.


Carefully following the reference planes, the ear is modelled by extruding edges from a plane shape.


After a long time spent, the ear is smoothed with the mesh smooth modifier and is ready to be attached.


When the head is in editable poly mode, the attach option is available by right-clicking. This allows the ear to be joined to the head model so they are one shape. Using target weld (as used extensively throughout the online tutorial), the ear is attached.


While building the head model, I did come across a few problems. The most notable was, after much confusion, realised my model was built inside out. This affected the hair modifier used and any lighting setups. This was overcome by applying the 'normal' modifier.

By creating a sphere (and cloning it), an eye can be placed inside the head. The eye material I used can be found at: 
[Internet] [Accessed 17/02/2011]


Applying a skin and lip texture makes it look a little more realistic. For the lips, I used Photoshop to change the hue of the skin texture. The texture can be found at:
http://www.filterforge.com/filters/547.jpg
[Internet] [Accessed 17/02/2011]


By adding a hair and fur modifier, found in the usual modifiers list, hair can be added. I set the colours to black with a specular tint of grey in the parameters and then enabled styling mode where you can essentially brush the hair. The hair length and thickness were also modified in the hair modifier's parameters. To select only a part of the model to have hair, use the face select option in the hair modifier and choose the ones you want to use, then click update.


Once again, the tutorial I used to model this head can be found at: http://www.secondpicture.com/tutorials/3d/3d_modeling_of_a_human_head_3ds_max_01.html
[Internet] [Accessed 17/02/2011]

And finally, I attached the head to the body I had made previously by going to the 3ds max logo > import > merge and selecting all the components.


Doing this has certainly made me appreciate all of the extremely high quality models in games and film today. I am satisfied with how he looks, but it is definitely a far cry from professional! Hopefully I will find a way to use this in my animation, but i'm not sure if it is taking too long to render.

16 February 2011

Tutorial 4 - 16/02/11

Today is about chrome/glass textures and lighting. First off is an image of some glass objects on in a chrome scene. Both effects were achieved by assigning raytrace.


With some blue walls, a chrome floor and some lighting, the following effect was made. Some of the spheres are chrome and the others are glass creating reflective bubbles.


For some reaspon this made me think of Mickey Mouse...The black spheres are just metallic with a black diffuse.

15 February 2011

3D Face

I've been following a great tutorial today which shows how to make a fairly realistic human head model which I need for my Bond animation. The tutorial can be found at: http://www.secondpicture.com/tutorials/3d/3d_modeling_of_a_human_head_3ds_max_01.html
[Internet] [Accessed 15/02/2011]

To start, I needed some reference plates of a head from the front and side. To Google! Strangely enough, the best I could find was of actor Jason Statham. Odd. Oh well, useful either way. This can be found at: http://img269.imageshack.us/img269/2843/referencey.jpg
[Internet] [Accessed 15/02/2011]

After following the tutorial for quite some time, I've got a model forming.


Pretty creepy looking thing, and has a bit of a Forsyth chin, but it can be adjusted later. I am purposefully altering points of the model from the reference plates because I don't want a complete likeness of Mr. Statham. More on this model to come later!

14 February 2011

Car Animation

After a bit of 3D today, I've put the car in motion. Had a go with reactor's 'toy car'...thingy, but to no avail. Too many things going wrong and the car bouncing wildly off the floor. Possibly too advanced for now? In the end I settled for manually animating it by moving the car and wheels across the plane (with a road and grass texture applied) and making each wheel rotate a bit to simulate them actually rolling along the ground. There is a slight, barely noticeable, noise modifier applied to the road to give it a bit of bumpiness too.

I threw the lighting and sky planes in a bit hastily which is why you can see the seams between sky panels and why some panels are too bright from some angles. "For the purposes of this demo, why not just set an image of clouds as the background (by going to rendering > environment and assigning a bitmap)", you ask? It didn't occur to me at the time so I overcomplicated it by using planes... :(

The camera angles were achieved by going to create > cameras > target camera. The camera's target was linked (by clicking 'select and link' on the main menu bar) to the car body so it followed it throughout the animation. The actual camera was then moved during key frames, just like the car, to achieve the spinning effects.


Just below is an image from the same scene. The road, grass and sky images used in this piece can be found at:
[Internet] [Accessed 14/02/2011]
[Internet] [Accessed 14/02/2011]
[Internet] [Accessed 14/02/2011]


Although this demo isn't perfect, it has helped me prepare for later animations. For example, lighting is more important than I thought. It can all look rubbish without a good setup. Also, the floor should have been much wider so the edges can't be seen. The real world is not a narrow strip! In my final animation I also want to add some corners for the car to take to make it more interesting, but for now the camera angles do the job.

9 February 2011

Tutorial 3 - 09/02/11

Today is all about materials. I started by creating 5 bitmaps using photoshop.


The 5 images I used can be found online at:
http://www.abstractdigitalartgallery.com/artgallery-psion005-abstract-digital-art-fractal-Psytrip.jpg
[Internet] [Accessed 09/02/2011]
http://www.filterforge.com/filters/547.jpg
[Internet] [Accessed 09/02/2011]
http://multifamilyinvestor.com/wp-content/uploads/2009/05/manhattan-skyline.jpg
[Internet] [Accessed 09/02/2011]
http://martinvogwell.co.uk/images/bground_sky.jpg
[Internet] [Accessed 09/02/2011]
http://amazingtextures.com/textures/data/media/4/bricks002.jpg
[Internet] [Accessed 09/02/2011]

The image below shows those materials assigned to a variety of shapes. By clicking the box next to diffuse in the materials panel, an image can be placed. On the brick block, the brick material has also been assigned to 'bump' which can be found under the 'maps' section of the material. This gives it a better 3D effect.


By setting IDs to different faces of an object, multiple patterns can be set to one object. Set the IDs by going to 'Polygon: Material IDs' in the editable poly menu. Set a number depending on which material is required. Then, in the materials panel, click 'standard' and go to 'multi/sub-object' and discard the material. Set how many materials are needed, then set them below. This teapot was made with an image on the body and a blue colour on the lid and spout.


To make a good metallic surface, the anisotropic shader is used. This material was made with the properties; Specular 60, Gloss 10 and Anisotropic 80. I chose a pale blue as the diffuse colour. In the 'maps' section, an image of the Manhattan skyline was assigned to the 'reflection' category and set to 100.


And finally, for today, is the leaf from the tutorial.

8 February 2011

Tuxedo!

After altering the shape of the shirt so it looked like there was a jacket over it (adding a lip wherever the jacket overlaps the shirt), I needed to work out how to add multiple materials to one object. After a while of searching, the solution was simple!


In the material editor, click 'standard' then select 'multi/sub-object'. Click set number to choose how many materials you want the object to have and edit them in the normal way below. To assign them, select a face on the object and scroll down until the section where material numbers can be selected. Change the numbers depending on which material you want that face to have.


All I need now is the animation rig and a head. Until then, this will have to do...

Low-Poly Bond

Just been messing around with 3ds today to make a basic human shape. Using reference plates and the box extrusion method, I created a block body shape. The legs, shirt, shoes and tie are separate objects.


Using the mesh smooth modifier makes the shape look more like a body. I found that making changes to a model with mesh smooth already applied very difficult. I overcame this problem by right-clicking the mesh smooth modifier and selecting 'off in viewport'. This keeps the modifier active, but disables it in your working view. I also made use of smoothing groups to make the shoe soles, legs top, shirt bottom and shirt cuffs flat. This is done by selecting 'smoothing groups' in the mesh smooth parameters, then by going to the number grid in the editable poly modifier with face selection active.


To make the tie form a natural, flexible material shape, I used the cloth modifier. Select 'object properties' and add all of the object that will be involved in the collision. In my case it was the trousers and shirt. Set the trousers and shirt as collision objects by selecting it at the bottom of the panel. Set the tie as cloth, then click OK. Now start the simulation by clicking 'simulate'.


Some hands were then formed with the box extrusion method and smoothed out.


Just need to work on the jacket and head, then rig the body up so I can animate it later. I'll work on that hurdle later...

*Super-fun-fact* 
Although this character is going to be wearing a tuxedo, in the film during the laser scene (which this will hopefully be used in), 007 is actually wearing all black, presumably from some espionage antics. I will watch the film soon, I swear!

7 February 2011

DB5

Same car as previous, just made some changes to clean it up. Pulled the sides of the car higher because they looked a bit low and smoothed out the bonnet. Also tried to fix that weird dimple by the back windows. Sort of fixed it, but thought putting an aerial in there would help too. Created an aerial with cylinders, wing mirrors with mesh smoothed pyramids and door handles with a torus. Its a bit lumpy overall, but I don't think I can do much better just yet. Its also a whopping 12.3MB which is much larger than any of my other work. I don't know if that's just how big the file has to be, or if I have missed some important file size reducing techniques.

Here's my previous one...

And here's the new and improved model.

4 February 2011

Didn't expect that...

Well, I am very surprised to say I have finished my DB5. Perhaps more detail can be added, but for now I am more than happy. I thought this was going to take me ages (well, it kind of has...about 4+ hours) but its done! With the body made from my last post, this is the detailing.


Firstly, the windows were achieved with thin boxes. Each panel started with a box that had faces extruded and vertexes moved. I've found that with this method, you can model pretty much anything! A glass material was then applied. For extra style points, they are tinted slightly black. The bumper was made with a cylinder, and once again extruded round the corner. A mesh smooth cleaned it up too. After adding a chrome effect, that was moved into place. The lights are simple red coloured boxes, and the plate with a plane with a bitmap assigned to it.


Both the front bumper and the license plate are clones of their car-rear counterparts. The front bumper needed a bit of scaling though to match the width of the car. The headlights are mesh smoothed cylinders with a self-illumination material applied. I set the diffuse to a very pale yellow, checked the self illumination box (to the right of diffuse) and toned down the opacity.


If I had to choose my least favourite part of the model, its the grill. A chrome effect has been applied, but its just a rough shape of the grill, not multiple bars. I think I could do it with time, but for now, I like it as it is.


By clicking the 3ds max logo in the top left of the screen and selecting import > merge, I could bring the previously made wheel into this world. Cloned in a few times and positioned them...done!


I'm already worried about the time my 30sec trailer will take to render :/ These images don't even have any light sources or cameras set up :o

Now if only I knew how to set up a wheel rig. I think it has something to do with Reactor, but that's a topic for another day, bye :)